

How To Clean Carburetor On Troy Bilt Leaf Blower
Part Number: 753-08025 Ships within 1 business day Product Information Description: This carburetor has a metal body and a rubber primer bulb. It is advised to replace gaskets (sold separately) when replacing carburetor to ensure top performance. To replace this carburetor you would need a screwdriver. • Remove air cleaner cover, filter and base Compatibility This part is compatible with the following machines: Products Compatibility This item works with the following types of products: Questions & Answers Is the carburetor for this Troy-Bilt backpack blower adjustable? Where can I find instructions for adjusting it? Thank You Robert for model number Troy-Bilt TB4BPEC asked on 2019-05-19 Hello Robert, Carburetors are almost standard on most all two-cycle engines. Two-cycle engines require that oil is mixed with the gasoline fuel. Failure to mix the correct oil in the gasoline will result in permanent engine failure and damage. Adjustment of the carburetor may have to be performed on a periodic basis and most definitely after the simple device is rebuilt. Adjustment will not take long and the small screws may have to be "tweaked" after the engine has warmed up and been running for a few minutes. Step 1 Identify the two-fuel adjustment screws on the side of the metal carburetor. One screw is labeled "lo" and the other is marked "hi". The "lo" fuel screw is for when the engine is idling. The "hi" fuel adjustment screw regulates the fuel when the engine is at full throttle. Step 2 Turn both of the screws, gently, in a clockwise direction to seat the base of the screw inside the carburetor. Do not tighten the screws with any form of a forceful nature. When dealing with these small carburetors "finesse" is a key word for manipulation. Step 3 Open the fuel adjustment screws in a counterclockwise direction one and three-quarter turns to two full turns. This is the starting point for most fuel screw adjustments. Step 4 Start the two-cycle engine. Allow the engine to warm up for approximately one minute to two minutes. The engine may be running a little rough, that is normal until final adjustments are made. Step 5 Hold the throttle wide open for full engine acceleration. Adjust the "hi" screw until the engine smooths out. In other words, the engine should not be missing or have any hesitation. In most cases the "hi" fuel screw will not have to be turned more than a one-quarter turn in either direction. Step 6 Allow the engine to return to an idle operation by releasing the throttle. At idle the engine should be running smoothly. Quickly depress the throttle again. If the engine hesitates open the "lo" fuel screw to a quarter turn counterclockwise. Perform the release and depression of the throttle a few times. The engine should go from idle to full RPM in a smooth progression. If the engine pops heavily at idle, when coming down from a full throttle, the "lo" fuel screw is delivering too much fuel. Turn the "lo" screw in a clockwise direction using no more than quarter turn increments. Repair Instructions: Submitted by Customers Like You 7 of 7 people found this instruction helpful Time Spent Repairing: 30-60 minutes Tools Used: Screwdriver, Socket set, Nutdriver Equipment would run at slow speed but stopped when you move to regular speed Remove the air cleaner assembly. Then remove the linkage and fuel lines from the old carburetor. Remember where the fuels lines go. Install new carburetor in reverse order. Started off quickly and would run at any speed. I have never had a problem with items purchase from Replacement Parts. Did you find this story helpful? Thanks for voting and helping fellow customers! 2 of 2 people found this instruction helpful Time Spent Repairing: 30-60 minutes Would not reach max rpm and difficult to start 1. Removed the original carburetor, gasket and o-ring Did you find this story helpful? Thanks for voting and helping fellow customers! 1 of 1 people found this instruction helpful Time Spent Repairing: Less than 15 minutes Tools Used: Screwdriver, Power Drill, Socket set, Nutdriver Carburetor was bad so I had to replaced, and I replaced spark plug and air filter as regular maintenance 1. Removing air filter cover and air filter Did you find this story helpful? Thanks for voting and helping fellow customers! 1 of 1 people found this instruction helpful Time Spent Repairing: Less than 15 minutes Tools Used: Screwdriver, torx bit set Blower won't run I'm going to be very brief on this repair. Pull of the gas lines off one at a time and place them on the new carburetor. Use the torx bit screwdriver and remove the bolts securing the carburetor. Remove the linkage cable and put it on the new unit and re-attach the carburetor. Your done. Did you find this story helpful? Thanks for voting and helping fellow customers! Time Spent Repairing: 15-30 minutes Tools Used: Screwdriver, Pliers, Power Drill, Nutdriver Carburetor leaking fuel Changed out old carburetor with new one Did you find this story helpful? Thanks for voting and helping fellow customers! Time Spent Repairing: 15-30 minutes LEAF BLOWER CARBURETOR BAD TAKE BREATHER OFF REMOVE TWO SCREWS REMOVE CARB, UNHOOK THROTTLE CABLE REMOVE GAS LINES AND REVERSE PUT 100% GAS IN AND YOU WONT HAVE TO DO THIS MY LEAF BLOWER WAS ONE YEAR OLD Did you find this story helpful? Thanks for voting and helping fellow customers! Time Spent Repairing: Less than 15 minutes Tools Used: Screwdriver, I used my Milwaukee ratchet. Code name \\ Gasket leak on carb (no prime), Missing air intake cover and filter Pulled the case with a torx bit on a 1/4 socket with my electric ratchet. Rear case seven or eight bolts. Pulled carb. Installed new carb as well as lines I had left over from a chainsaw swap. Installed torx screws. Air intake was outer case and popped into place. Fourth pull she fired right up. I forgot to add before the parts arrived I had cleaned the plug with sand paper a wore brush and some starting fluid and re gapped. Sold it for $150. A little over a hundred dollar profit all said and done. Did you find this story helpful? Thanks for voting and helping fellow customers! Time Spent Repairing: Less than 15 minutes I followed the ereplacement parts YouTube video for how to replace a carburetor on a craftsman blower. Did you find this story helpful? Thanks for voting and helping fellow customers! Time Spent Repairing: Less than 15 minutes Tools Used: Screwdriver, Pliers, None Gas leak Removed filter cap, unscrewed two screws and unscrewed four more off of the Carburetor. Removed the old carburetor. And installed the new carburetor by putting all of the screwing back on the blower. Did you find this story helpful? Thanks for voting and helping fellow customers! Time Spent Repairing: Less than 15 minutes Install new carburetor tiller Remove the air cleaner Did you find this story helpful? Thanks for voting and helping fellow customers! show more Reviews Average Rating (out of 5): 6 Reviews Click to filter by ratings: Showing reviews with 4 stars. Show All Reviews Quick Repair The order process and delivery was smoorh. Received the carb and swapped it out in 5minutes. It's literally two thru screws holding the filter unit and carb to the engine. Disconnect two fuel lines and throttle cable after removal of scews. Assemble in opposite order to install new carb. Viola-back up and running! Guest - May 4, 2021 Verified Purchase perfect fit just like new easy replacement saved a lot of cash Guest - December 8, 2020 Verified Purchase Troy bilt of 5 years Received my carburetor on time this is the first time I purchase it for my leaf blower quick install working like new, thank you so much. Ismael - November 12, 2019 Verified Purchase All was great willuse you again Got it quicker than expected Guest - September 26, 2019 Verified Purchase Easy replacement This is such an easy fix, about 5 minutes. Received the part very promptly. My only complaint, and not with your company is that I should not have needed a new carburetor in less than a year of purchase. Guest - May 22, 2019 Verified Purchase Worked great, but the idle bracket is plastic and was broken. I decided to go ahead and try the carb anyway and was able to adjust the idle with throttle cable adjustment which works fine. Probably would be better to ship in a small box of some kind. I'm a happy customer. Guest - May 9, 2019 Verified Purchase Product Information Repair Guides Watch the Repair Video for Carburetor Carburetor
![]()
Manufacturer: Troy-Bilt Product Number: 753-08025 Classification: Part Weight: 0.23 lbs. Shipping: Ships Worldwide
• Disconnect fuel lines and throttle cable
• Remove screws that secure carburetor
• Remove old carburetor
• Install new carburetor using two (2) screws
• Re-connect fuel lines and throttle cable
• Re-assemble and test the unit
2. Detached the control cable leading to the carburetor.
3. Installed the new gasket, installed the new o-ring on the carburetor.
4. Installed the carburetor using the original screws and attached the control cable.
5. Bumped the bulb 10 times with the choke on nd pulled the starter cord.
6. The motor fired up on the first crank and was running on choke.
7. I took it off of choke and it ran fine, installed the air filter and cover and began blowing off my patio. NO ISSUES , THANKS
2. Removing 2 screws holding filter base and carburetor
3. Removing gas lines and removing accelerator cable
4. Connecting gas lines and accelerator cable
5. Screwing back new carburetor and filter base
6. Installing new air filter and cover
7. Replacing spark plug
8. Starting it and checking that everything is ok.
Done!
Remove the fuel lines and throttle
Remove the screws holding the air cleaner plate and old carburetor
Remove the carburetor and plate
Install the new carburetor and the plate
Replace the air cleaner
Manufacturer: Troy-Bilt Product Number: 753-08025 Classification: Part Weight: 0.23 lbs. Shipping: Ships Worldwide 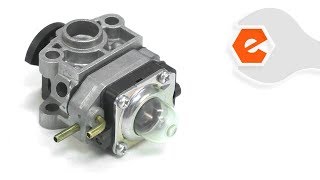
![]()
How To Clean Carburetor On Troy Bilt Leaf Blower
Source: https://www.ereplacementparts.com/carburetor-p-1726023.html
Posted by: dowellchader.blogspot.com
0 Response to "How To Clean Carburetor On Troy Bilt Leaf Blower"
Post a Comment